Back to the Buttons
After my previous post I'm sure you've started playing with some of the settings, or at very least have some appreciation of what functions are available. You can go through the menu instead if you prefer, but the use of these buttons is quicker.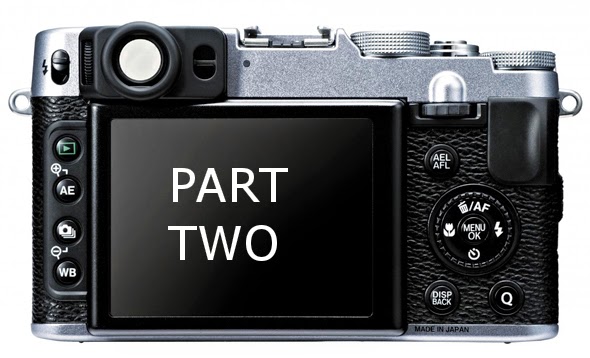 |
| More buttons on the rear of the Fujifilm X20 |
There's still a few more on the back that we haven't looked at yet, and as before I'll keep it brief and simple.
Three From the Right
We'll move over to the right hand side of the camera now, and look at the three buttons around the menu selector.
The exact function can be set in the menu, but it's use allows exposure and focus to be locked, then the photographer can reframe (or compose) the picture. Also know as centre focus and reframe.
If the camera is set to AE.AF LOCK MODE in the menu, then this button will keep the exposure and focus locked until re-pressed, or until the zoom is altered.
Using this button is like half pressing the shutter button, so you'd wonder why they provided it. But it does allow more flexibility if you want to split auto focus and auto exposure. This would result in a three stage process for taking a photo:-
- Centre on the object you want the camera to meter on and hold the AEL/AFL button.
- Centre on the main object, half press and hold the shutter too.
- Reframe the photo and take the picture.
At first this wouldn't do anything for me, but then I realised I had face detection turned on which silently overrides any exposure or focusing settings.

This is another one of those buttons with multiple functions depending on what mode you're in. In shooting mode this will allow you to select the LCD display mode, and so choose how much information is shown when taking a shot. My preference is for Information2, but I also like the Custom setting with it's live histogram and spirit level function. These settings include the exposure compensation, which is handy as a reminder if you've altered the setting. (well it often catches me out!)
Another function in shooting mode (that's not obvious) is enabling silent mode. Press and hold the display button and the camera speaker, flash and auto-focus lamp will be disabled. This is great when I was taking pictures at a school show and didn't want to annoy my fellow audience members with my frequent snapping.
Lastly it's the back button when using the camera's menu.

Settings are important to get your camera configured how you like it, and with the X20 there's a lot of customisation that you can do to make it better fit your needs. But although the menu's well laid out, it's pretty typical that you'll hunt a little before you find what you need. This is why many pro cameras have plenty of external controls, but it makes the camera more expensive and overwhelming to use.
The Q button effectively gives you access to 16 different options, yet still keeps the back of the camera looking relatively simple. In practice I find the grid format to be tricky to use, but that's partly because I don't use it much. Use the menu selectors to move about, and rotate the sub-command wheel to alter the setting.
Selector Buttons
Now we've got the obvious buttons out of the way we'll look at the menu selector with it's direction buttons their secondary roles.
Allows you to select the focus point in shooting mode, which will default to the centre of the frame. Use the selector direction buttons to move this, or command dial (the one at the top) to resize the focus frame. I gotta say I don't think you'll need this much. It's far easier to use the "centre focus and reframe" method, and under most circumstances you shouldn't have any focal plane shift focus problems.

Used to delete the picture currently displayed on the LCD screen. There's also a delete all option which is a good way of blanking the memory card.
You can continue going through your photos deleting with the OK button as required, and then press the shutter once you've finished.

It quickly becomes apparent that you must raise the pop-up flash before this can work, but once done this gives you access to the following modes:-
- Auto Flash - Flash fires only when required. (the manual recommends this)
- Forced Flash - Ideal for back-lit subjects where the flash wouldn't ordinarily fire, or in very bright light where shadows can become a problem. Most people dont think of using the flash in daylight, but in bright light this can be a real Help.
- Slow Synchro - Captures the main subject and background under low light to try and retain some of the original lighting.

There are two options available, plus the default off. I won't go into detail because it's pretty obvious:-
- 10 second delay
- 2 second delay

If you want to take really close-up photos then you've found the right camera. Macro mode enables to camera to focus at much closer ranges.
There's also a Super Macro mode that enables you to get down to 1cm from your subject but the following restrictions apply:-
- The lens must be zoomed all the way out.
- The flash is disabled.
Conclusion
Well that's all the buttons on the camera back, although I did skip the menu button. There's still a few more controls remaining that we can look at another time, and I hope you've find this blog useful.Part 1
No comments:
Post a Comment